Taking on a DIY window replacement is no small feat. With so many potential pitfalls, it’s essential you know how to avoid the most common window installation mistakes.
An amateur window installation doesn’t necessarily equal a bad window installation—but professionals are professionals for a reason. That’s why it’s always better to get educated up front, sidestep the blunders, and head in with confidence…rather than try to wing it and pay more to fix a costly mistake down the line.
So let’s dig into nine of the most common window installation mistakes we see when folks try to DIY their window installation (so you can avoid them!).
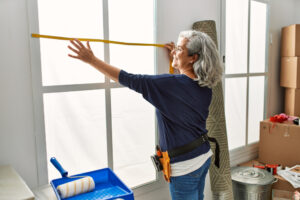
1. Measuring the window opening wrong
Incorrect window measurements are by far the most common mistake homeowners make when it comes to DIY replacements, largely because window measurement is not always an exact science. While many windows come in standard sizes, homes built during different periods or in different styles may have different window dimensions.
Additionally, many homeowners simply don’t know how to properly measure a window for replacement. Ordering the correct replacement window requires knowing what to measure, and where to measure—like whether or not to start at the inside or the outside of the jamb.
Start by getting familiar with the parts of your window before you pull out your measuring tape. When in doubt, it’s always best to call in an expert to make sure you’re ordering the perfect window for your home.
2. Not following the manufacturer’s instructions
Even if you’ve successfully installed a window before, it’s crucial to read the instructions on each window before starting the process. Different window manufacturers may have slightly different procedures due to the frame material, type of glass, or even distance traveled.
Even if you think you know what you’re doing, always take a few moments to triple-check the instructions. Those extra minutes could save you thousands of dollars.
3. Leaving gaps around replacement windows
Installing a brand new window when building a home is simple—you’ll typically leave it up to the contractor. But if you’re a homeowner who’s replacing a window DIY-style, you’ll need to deal with several complications, including removing the old window.
When you remove your old window, you leave behind a mess of an opening that needs to be cleaned, smoothed, inspected for damage, and potentially repainted.
If you don’t measure correctly or damage the window opening during de- and re-installation, the process can leave you with leaky gaps around your window that can be difficult to repair. The key to a successful installation is avoiding them in the first place.
When in doubt, have an expert come to inspect your windows. When it comes to leaks, the immediate fix is always less costly than long-term water damage.
4. Ordering the wrong window
When you’re ordering a replacement window, you don’t just have to know the right size: you have to know the right style and material. Not all window styles, glass types, or frame materials are created equal. If you want your window to last (curious about how long windows should last?), you need to know every detail about your order.
What style is your current window? Can you upgrade or is your house a protected historical property? What types of glass and frames are ideal for your climate? Do you need any additional materials to install the type of window you’re interested in?
These are all essential questions to ask before you go shopping. Otherwise, you may end up paying even more down the road to a professional to fix your mistakes.

5. Securing the window without leveling
Unfortunately, installing a window is far from simple. Windows rarely fit their openings perfectly—even when measured by a professional. As a result, it’s extremely important to make sure your window is plumb, level, and square before finalizing its placement.
The last thing you want is to make it all the way through the installation process only to discover your window ended up awkwardly crooked, angled, or protruding. Take your time during the securing process and always double-check your work. If you’re having trouble, you can always use shims to adjust your window or call in an expert.
6. Using spray foam incorrectly
There are two ways spray foam can go awry:
- Using too much spray foam to correct huge gaps. Ideally, you shouldn’t have large gaps after your installation, but if you do, spray foam is not the best solution. While a normal amount of spray foam provides helpful insulation and protection, a large amount can damage your window and impact ventilation and water drainage.
- Using the incorrect foam. Spray foams come in expanding and non-expanding varieties. Only non-expanding foam should be used during window installation. As it hardens, expanding foam can push at different parts of the window and cause warping, breakage, and off-centering.
Always stick to the recommended amount of spray foam and make sure you’re using the non-expanding kind.
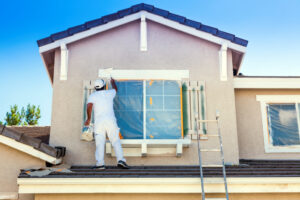
7. Poor installation of weather-resistant barrier
Nowadays, most window installations involve the addition of weather-resistant barriers (WRBs). WRBs help regulate the temperature in your home—especially if you’re not using energy-efficient glass.
When installing WRBs, it’s crucial to not only install them correctly but to make sure you’re using the proper WRBs for your climate. Extreme temperatures can cause materials to react in different ways; if you use the wrong ones, you risk high heating and cooling bills alongside potential damage to your window.
8. Forgetting a backslope
The backslope on your window refers to the sloped angle of your windowsill that allows for water drainage and runoff. Why is this important? Water damage poses one of the biggest threats to your windows and home structure. Backslopes allow water to naturally run off and away from your window after rain or snow—keeping water damage to a minimum.
If you forget your backslope and don’t realize it until the very end of your installation, you’re left with no choice but to remove all of your hard work and start again.
9. Not consulting with a professional
A DIY installation doesn’t mean you have to completely go it alone. Even if you handle all the grunt work, it’s always a good idea to consult with an expert before opening your wallet. At bare minimum, you’ll want to make sure you’re ordering the right window size and style and that you have the right materials on hand for a successful installation.
The worst possible outcome from a consultation is finding out you actually do need to hire a contractor—and that’s a pretty good outcome considering the costly alternative if you make a mistake.
Bottom line: contractors are here to help. In fact, they can be your greatest asset whether you’re looking for a fully professional installation or just a bit of advice. At Window Nation, we’re here to help no matter where you are in your replacement or installation process.
Worried about avoiding these common window mistakes? Contact Window Nation today for friendly expert guidance and a free quote.